(Cover image: A combination of Next.js and Strapi logos)
Welcome, future full-stack developers! Today, we will embark on a journey that will take us through the magical world of Next.js and Strapi. Whether you’re a seasoned developer looking to expand your skills or a newcomer interested in the latest web technologies, this guide is designed for you!
Before we dive in, let’s do a quick roll call of our digital companions for this adventure:
-
Next.js: This open-source, flexible React framework equips you with the tools to build fast, high-performing web applications. It’s beloved by developers worldwide for its developer-friendly features, like automatic routing, server rendering, and static exporting.
-
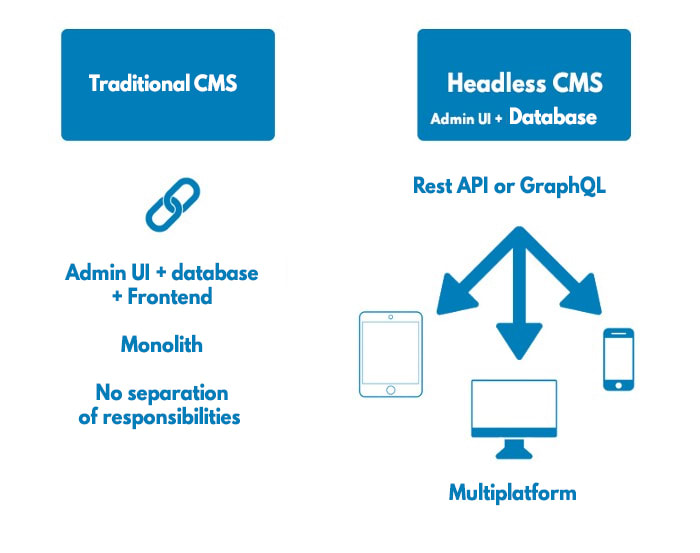
Strapi: This headless CMS allows you to create and manage your content seamlessly. It’s customizable, developer-friendly, and can be integrated with various databases.
Now that we know who we’re travelling with, let’s get started!
Setting Up Your Environment
Before building our marketing website, we must ensure that our development environment is in order. Here’s a step-by-step guide on how to prepare your workspace:
- Install Node.js and npm: Next.js and Strapi require Node.js and npm (Node Package Manager) to function. If you haven’t installed them, head to the official Node.js website to download the latest stable version.
(screenshot: Node.js installation page)
-
Install Strapi: With Node.js and npm installed, open up your terminal or command prompt and run the following command to install Strapi globally:
npm install strapi@beta -g -
Install Next.js: In your terminal, use the command below to create a new Next.js application:
npx create-next-app@latestWhen prompted, name your application as you see fit.
Creating Your Strapi Back-End
With your development environment ready, it’s time to start shaping our marketing website! Let’s begin by setting up the back end with Strapi.
-
Create a new Strapi project: In your terminal, navigate to the directory where you want your project to reside and run the following command:
strapi new my-project --quickstartReplace “my-project” with your desired project name. The
--quickstartflag sets up a SQLite database for you automatically. -
Create a new “Article” content type: Once Strapi is up and running, navigate to the Strapi admin panel. You’ll typically find this at
http://localhost:1337/admin. From here, create a new “Article” content type with fields for “title,” “content,” and “author.”
(screenshot: Creating a new content type in Strapi admin panel)
- Add some content: Populate your new “Article” content type with some entries to play around with.
Building Your Next.js Front-End
With the back end ready, we must focus on the front end. Here’s how to get started with Next.js:
-
Fetch data from Strapi: In your Next.js application, use the
getInitialPropslifecycle method orgetStaticPropsandgetServerSidePropsdata fetching methods to fetch data from your Strapi back-end. -
Display data: Once you’ve successfully fetched the data, display it in your components using props.
-
Create pages: With Next.js, creating new pages is as easy as adding a new file in the
pagesdirectory.
And voila! With those steps, you’re on your way to creating a full-fledged marketing website using Strapi and Next.js.
Remember, this guide is a starting point. There’s so much more you can do with these powerful tools. So keep exploring, keep coding, and most importantly, have fun!
Are we looking for React, Gatsby, Vue, Nuxt.js, and Blazer guides? Keep an eye out for our upcoming tutorials!